Lumbar Disc Herniation & Yoga--My Personal Journey
I remember feeling hopeless. Would I ever live a life without chronic pain? I had debilitating back pain from a very young age. I was diagnosed with spinal stenosis and disc herniation at L-3, L-4, L-5, and S-1. We had to move out of our condo because I couldn’t get up and down the stairs. I thought it would go away on its own, but for years it didn’t. I was told that the only way to get better was surgery. I was in my mid-twenties, and this wasn’t the first time that surgery was suggested. When I was 18, I was scheduled for surgery, and during the pre-op appointment, the surgeon just said, “let’s not do this.”
This time in my life was the impetus for throwing myself into studying everything I could about what was happening in my body. I wasn’t 100% against surgery, but I was curious about the potential of my body to heal on its own. All I had to do was learn how to create an environment for healing to happen. I studied everything that I could find about the spine and disc herniations. I knew the injury inside and out. I studied movement and how my spine responded when I put my body in particular shapes. This curiosity was also the beginning of my journey with yoga.
At first, I charged into yoga as I had every other physical activity in my life—with FULL FORCE. I went at it hard. Just writing this makes me laugh. I was going to HEAL MY BACK WITH YOGA. Well—-needless to say, I made it worse. I didn’t understand the importance of slowing down, feeling, and sensing my way through. I had no sense of embodied self-awareness. I also didn’t come across any yoga teachers that had the knowledge to support me. It wasn’t their job to diagnose or treat me, but some guidance could have made my entry into yoga more helpful. Still, it wasn’t the fault of anyone else.
This experience fueled my curiosity even more. I wanted to know why and how I made my injury worse and what I could do to be more effective in my movements. I kept studying, and my body was my experiential learning lab. Today I am 47 years old and have no low back pain. I believe that these two things have been the essential tools along my path of healing:
Self-Education
Learning how to slow down and feel
I am in no way saying that this is an easy path. I am also not saying that surgery is never needed. Sometimes it is. However, I do believe that back surgery is one of the most over-used medical procedures today. Our bodies are amazing and capable of incredible things. We have to know how to support them.What follows is my original blog post on this topic.
Educating yourself is a vital step toward healing.
There are seven cervical, twelve thoracics, and five (sometimes six) lumbar vertebrae, along with the fused vertebrae within the sacrum and the coccyx. The vertebral bodies are separated by 23 intervertebral discs made up of fibrocartilaginous material, which provide cushion and shock absorption for movement. The spine has primary (kyphotic) curves along with secondary (lordotic) curves. This precise combination of curves and shock-absorbing discs is vital for load-bearing. Without this design, we could not run, jump, or stand on our hands and land back on our feet without breaking.
The musculoskeletal body balances under the principle of tensional integrity. Imagine a tall flexible tower being supported by surrounding cables tethered to the ground on all sides. If one cable becomes overly tight or overly loose, the tower (the body) will be pulled off of its center. This dynamic is what happens in the spine. Daily postural habits, combined with your unique musculoskeletal makeup, can cause soft tissues to become overly tightened or overly lax. Once the tower of the spine is pulled off-center, uneven distributions of force and pressure land in the discs, eventually causing weak points, typically in the posterior lateral wall of the disc. If not corrected, this imbalance leads to degradation, pain, and chronic injury. Degradation can present its self in the surrounding soft tissues, the nerves, the bones, and or the intervertebral discs. If you want to move toward healing, it is vital to move back toward balance. An intelligent yoga practice can be a useful tool for encouraging musculoskeletal balance.
I get regular e-mails, phone calls, and personal inquiries from people seeking out yoga for relief from back pain. The majority of them have an intervertebral disc herniation. Some of them come to class because their doctors have recommended it, and others have friends or acquaintances who sing the praises of yoga. Maintaining the health of the spine is multifaceted. First off, we should never dismiss the essential components of nutrition, hydration, sleep, and mental health, which all have an impact on the wellbeing of spinal structure and function. When seeking out holistic healing from any modality, it is crucial to address the WHOLE. Luckily, yoga not only addresses the physical structure but also cultivates mindful awareness and the use of breath as a means to invoke parasympathetic tone and overall nervous system balance. Parasympathetic tone increases our ability to minimize the negative impacts of stress and anxiety on the body. This understanding is paramount when addressing any physiological healing.
If yoga is approached without awareness, it has the potential to exacerbate your injury. If it is approached with a tuned-in awareness, it has the potential to help you find long-term relief. The key is to slow down and tune in. I also highly recommend learning more about your body and your unique injury. Know what it looks like, where it is located, and how it responds to movement. My book, Embodied Posture: Your Unique Body and Yoga, has detailed information with beautiful illustrations to help you learn more about your body.
Although pain and discomfort are urgent messages from the body, it is essential to note that pain is not always felt with an injury. Pain is subjective and is not always the best indicator of the severity of the injury. I am also not claiming a one-size-fits-all protocol here. You are the ultimate authority on your body, your injury, and your yoga.
Things to consider with your yoga practice if you have a lumbar disc herniation, bulge, or inflammation:
1. Always avoid postures that cause sharp or urgent pain. Pain can be in the moment or residual pain, hours, or days after. Sometimes therapeutic movement can cause discomfort that might be confused as pain. This investigation is your path of learning to feel within your own body.
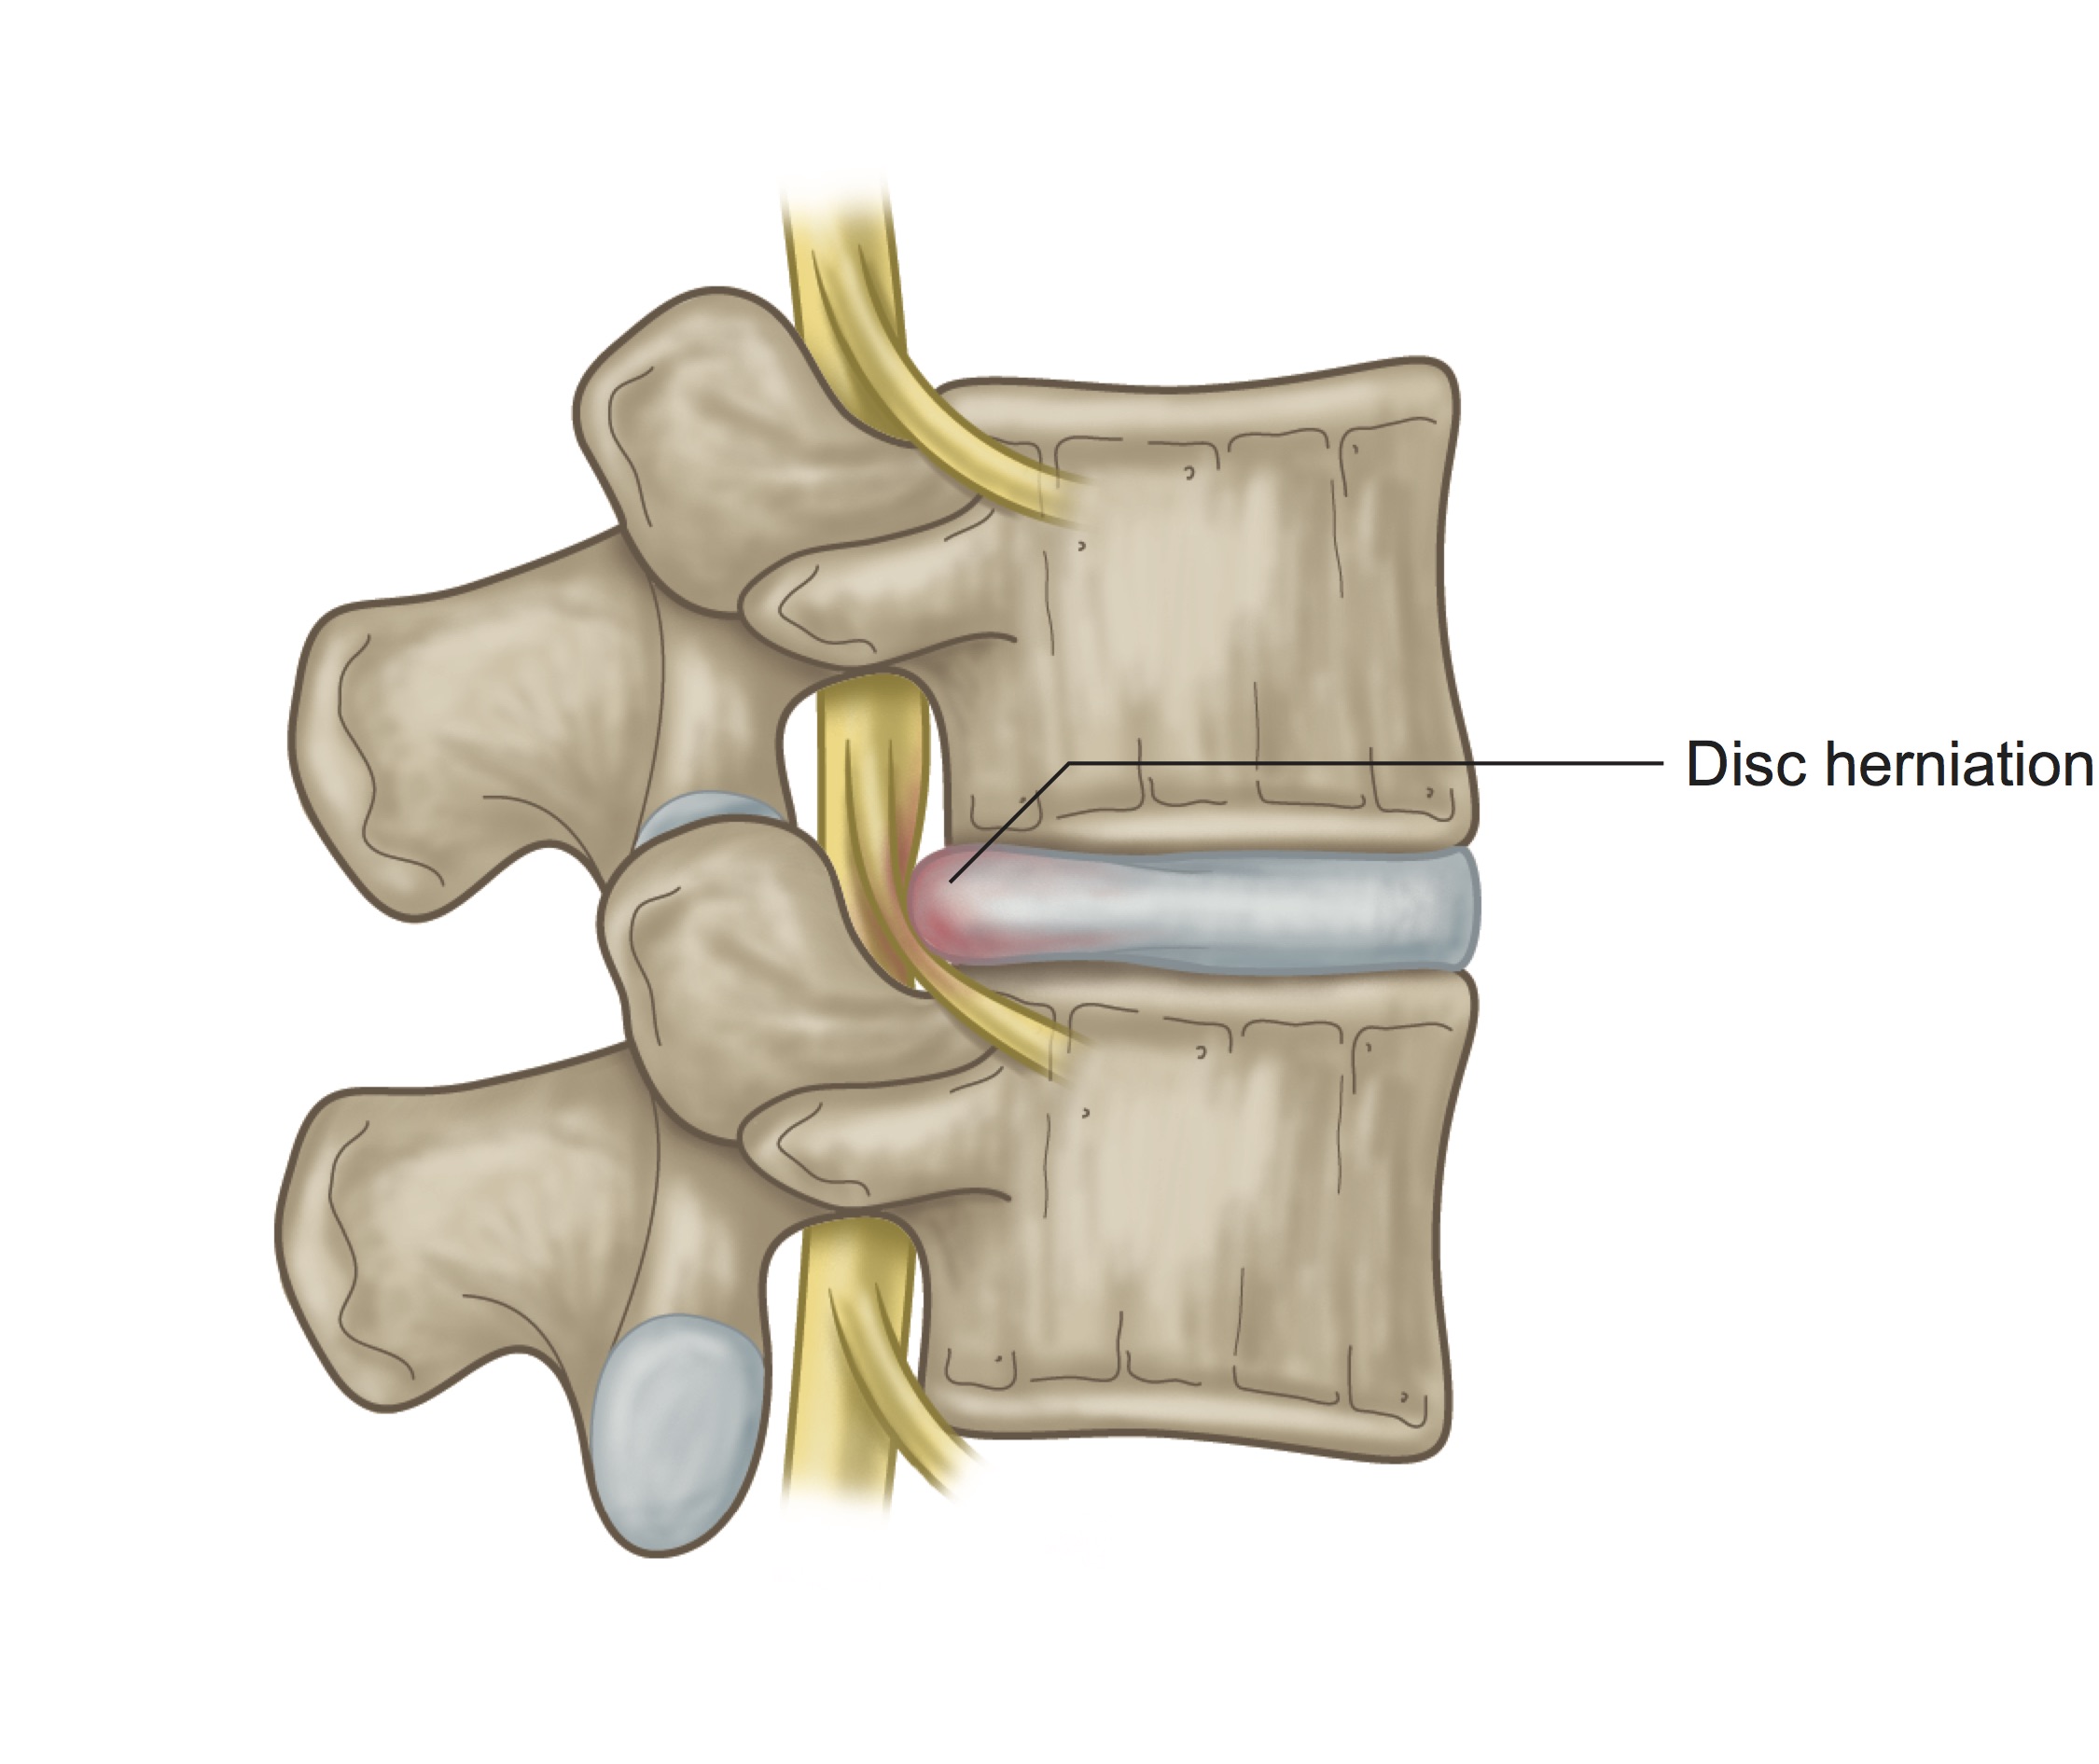
2. Be cautious with any postures that create a forward flexed (rounded) lumbar spine. Look at the lumbar disc image here. Notice how the bulge pushes back toward the spinal canal. Forward rounding would move the anterior edges of the vertebrae more together, while the posterior edges of the vertebrae would expand apart. Sort of like the two graham crackers of a s' more squeezing together on one edge while the marshmallow in between squishes back. This movement encourages the disc material to push farther in the direction toward the spinal canal, possibly exacerbating the problem. All forward folding should either be avoided or cautiously approached with bent knees. Bending the knees will release some back of body tightness (posterior chain) and lend toward keeping an elongated spine rather than a rounded one. One thing that I have seen help students with this injury is the use of 2 tall blocks at the front of their mat. If you try this, while the rest of the class is forward folding, keep your fingertips on the blocks and focus on an elongated spine in Halfway Lift position and skip the forward fold. Keep your knees very bent here to allow a release in the posterior chain. Keep in mind that Halfway Lift is also a forward folding position. Depending on how severe your injury is, this might be too much at first. If so, stay upright in a pose like Mountain or Chair while the class is in Halfway Lift and Forward Fold.
3. Elongate the spine, elongate the spine, elongate the spine. Stand tall, sit tall, bring the elements of Mountain pose into everything you do on and off the mat. This will help wire in the invitation to your spine to return to its naturalness. It will bring spaciousness between the vertebrae and discs, increase blood flow, stretch the spinal muscles that need to be stretched while strengthening those that need strengthening. Remember that elongating the spine is not n effort to minimize your spinal curves, but to restore them—don't over muscle this action.
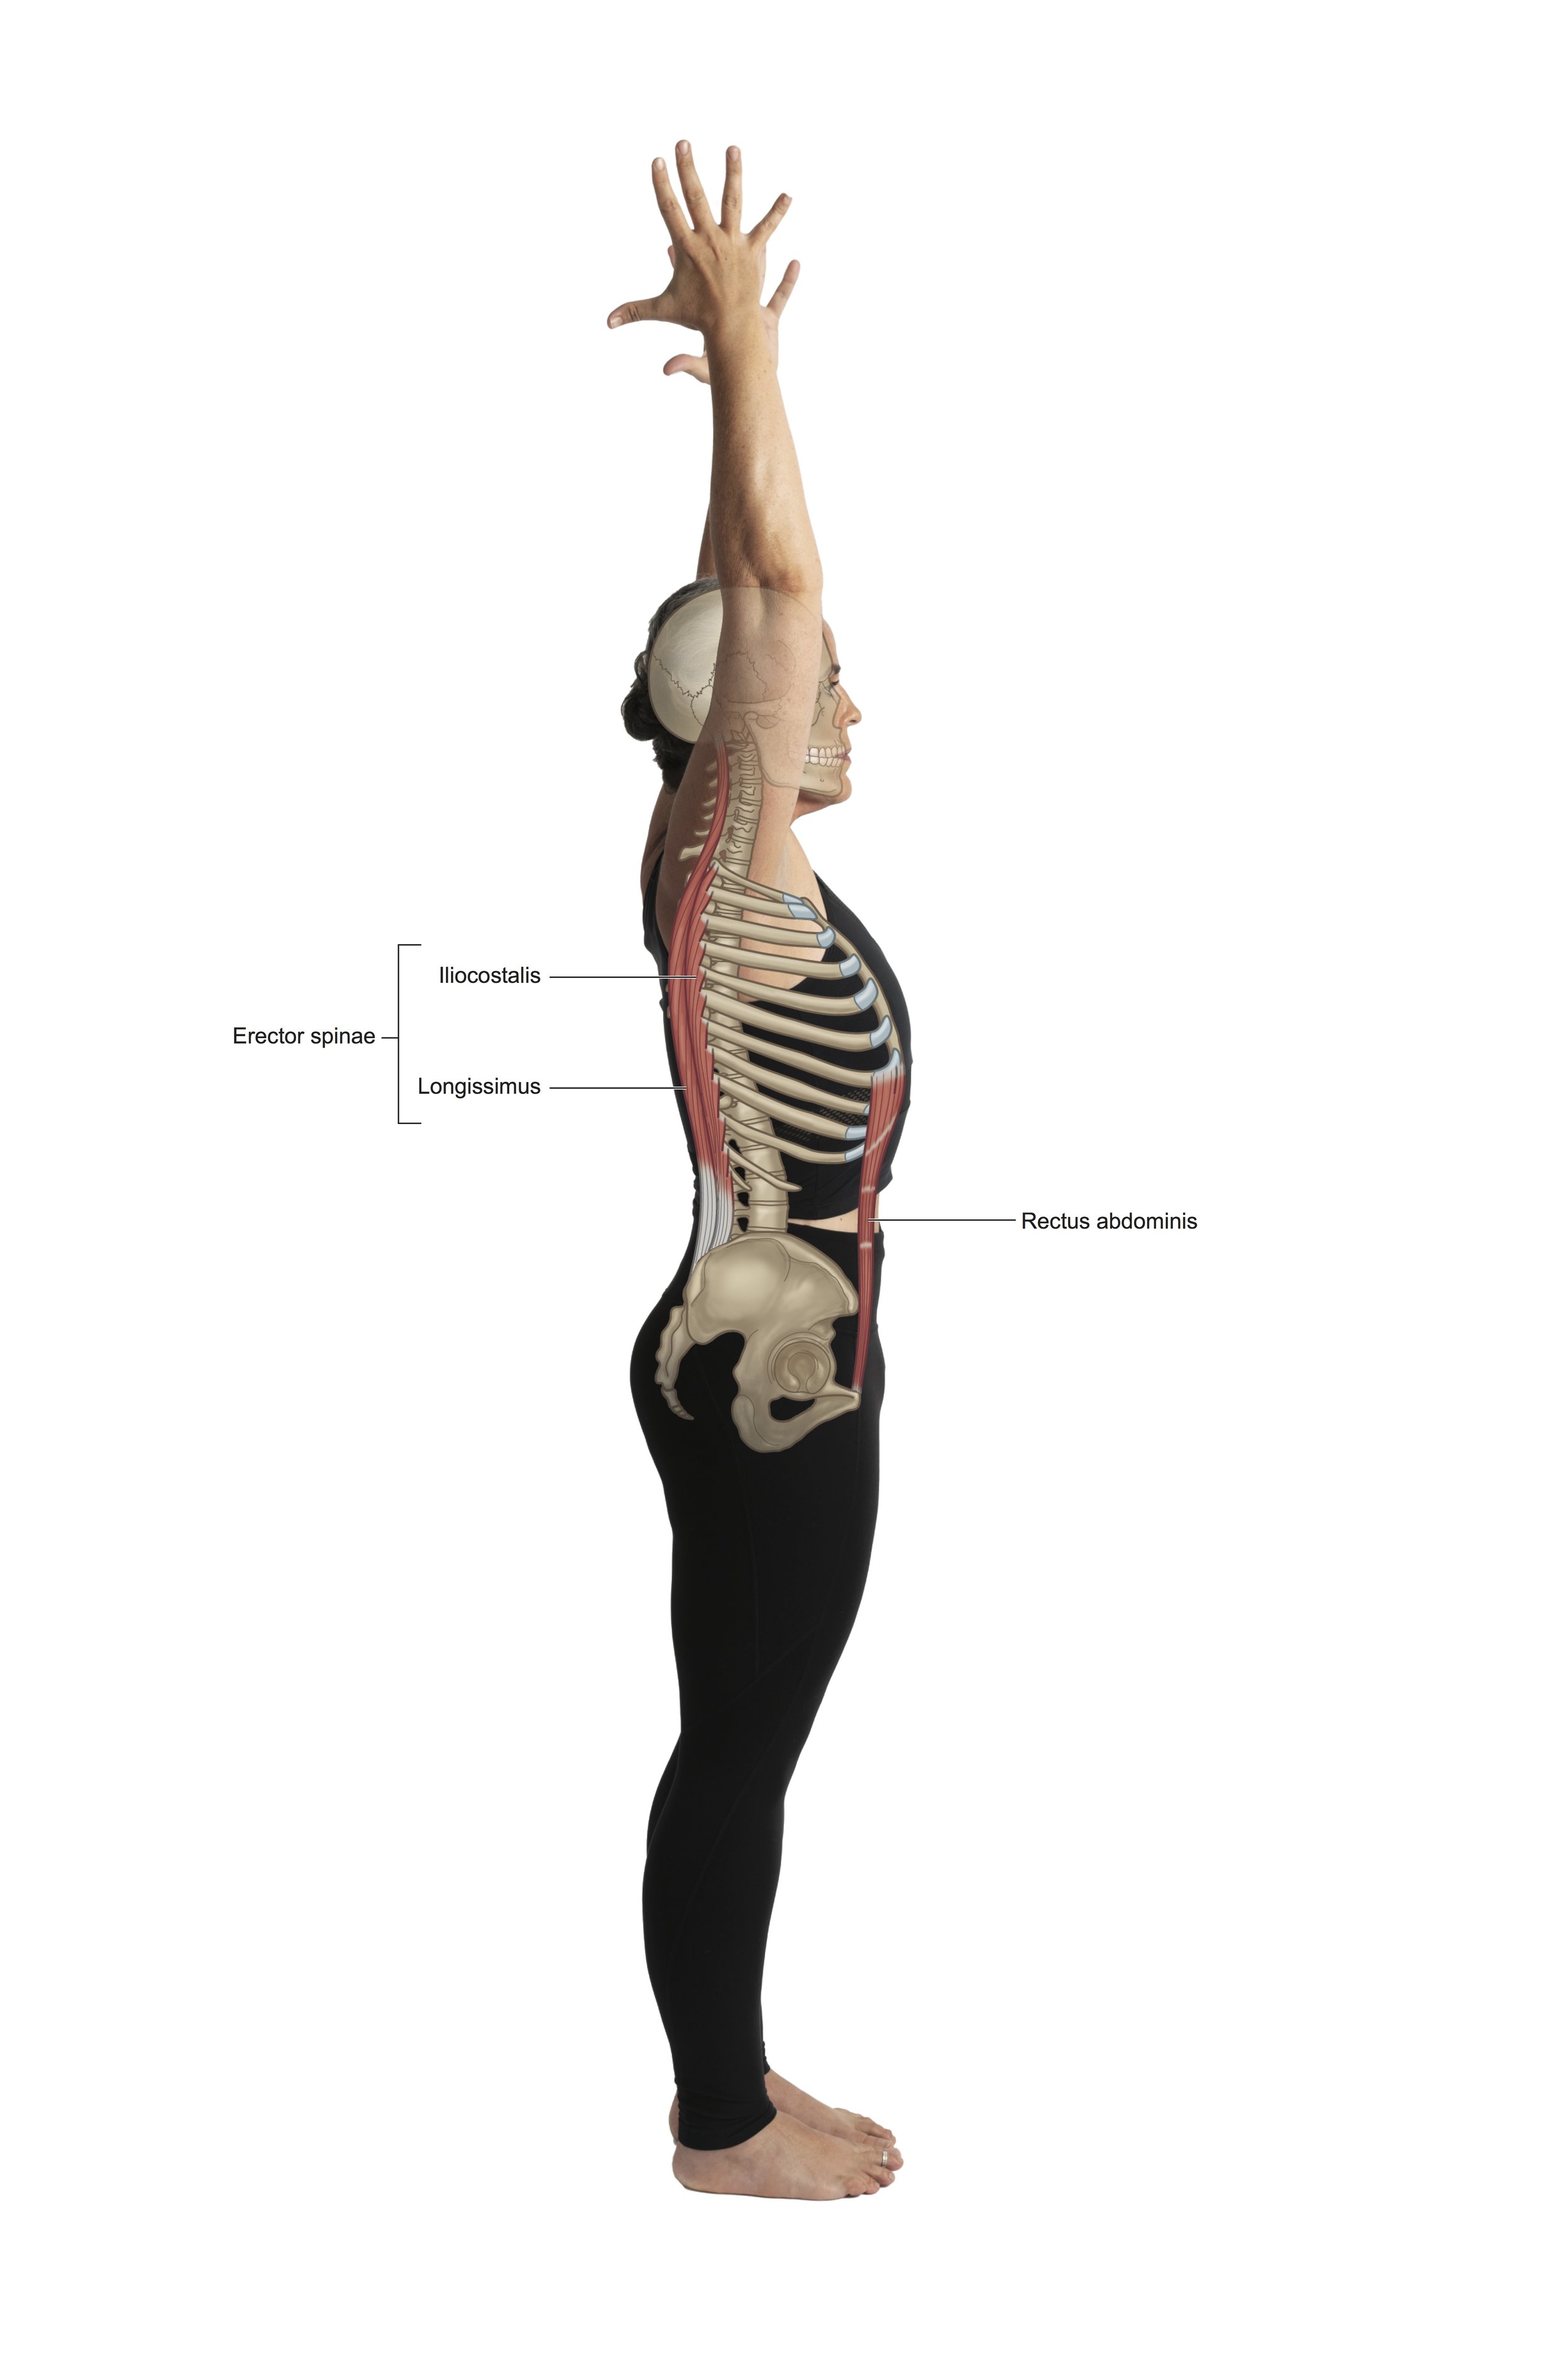
4. Strengthen your core, but not with sit-ups and crunches. These can be beneficial at times, but what you need in order to heal this injury is overall, functional balanced strengthening in the trunk stabilizer muscles. Practice sitting upright, nice and tall, as in a meditation position, without leaning on a chair back. Don't let yourself slouch forward. As you aim to sit tall, make sure that your low front ribs aren't blowing forward, moving your spine into extension or backward bend. Feel the muscles that have to work to maintain this awakened, upright position. Visualize a string pulling you up from the top of your head, connecting the entire length of your spine. Set the timer for 3 minutes and slowly increase your time. Practice longer, more in-depth, slower breaths while you are here. This will build a gentle, solid foundation of strength that will be supportive of healing.
5. Slowly work towards incorporating spinal extension/backward bending poses. Earlier I mentioned the s' more marshmallow squishing toward the spinal cord in spinal flexion. Just the opposite happens in spinal extension, the marshmallow (disc) squishes away from the spinal cord. See the image below of a spine in extension.
Keep in mind that your severity of the injury determines when and if these movements are appropriate for you. The simplest of backward bends can be approached first. Sitting tall in a chair while arching into a slight backbend or lying on the floor for Sphinx pose is a good start. Backward Bends can be a vital part of healing a lumbar disc injury when approached slowly with a tuned-in awareness. Each person and injury is unique--if and when this is beneficial can only be determined by the individual. The book: Cure Back Pain With Yoga, by Loren Fishman, M.D., and Carol Ardman, has excellent information on using backward bending to heal lumbar disc injury.
6. With disc herniation, the soft tissues surrounding the hips will probably be reactive, tight, and imbalanced. Practice gentle stretches for the lower body, and remember---a little goes a long way. Try Pigeon poses or variations of Pigeon that are accessible. Hamstring stretches done on the back are useful because the pelvis and spine are stabilized, eliminating the probability of spinal rounding. Use a strap or towel looped around your foot and go only to the point of mild stretch. Use longer, slower, deeper breaths. Practice low lunge postures to encourage your hip flexors (fronts of hip creases) to release and relax.
7. Use your Doctor and Physiotherapists instructions to design a new practice that works for you along your path of healing.
8. Trust yourself to understand your own body and what is best for you. Use your injury as an opportunity to slow down, tune in, and learn.
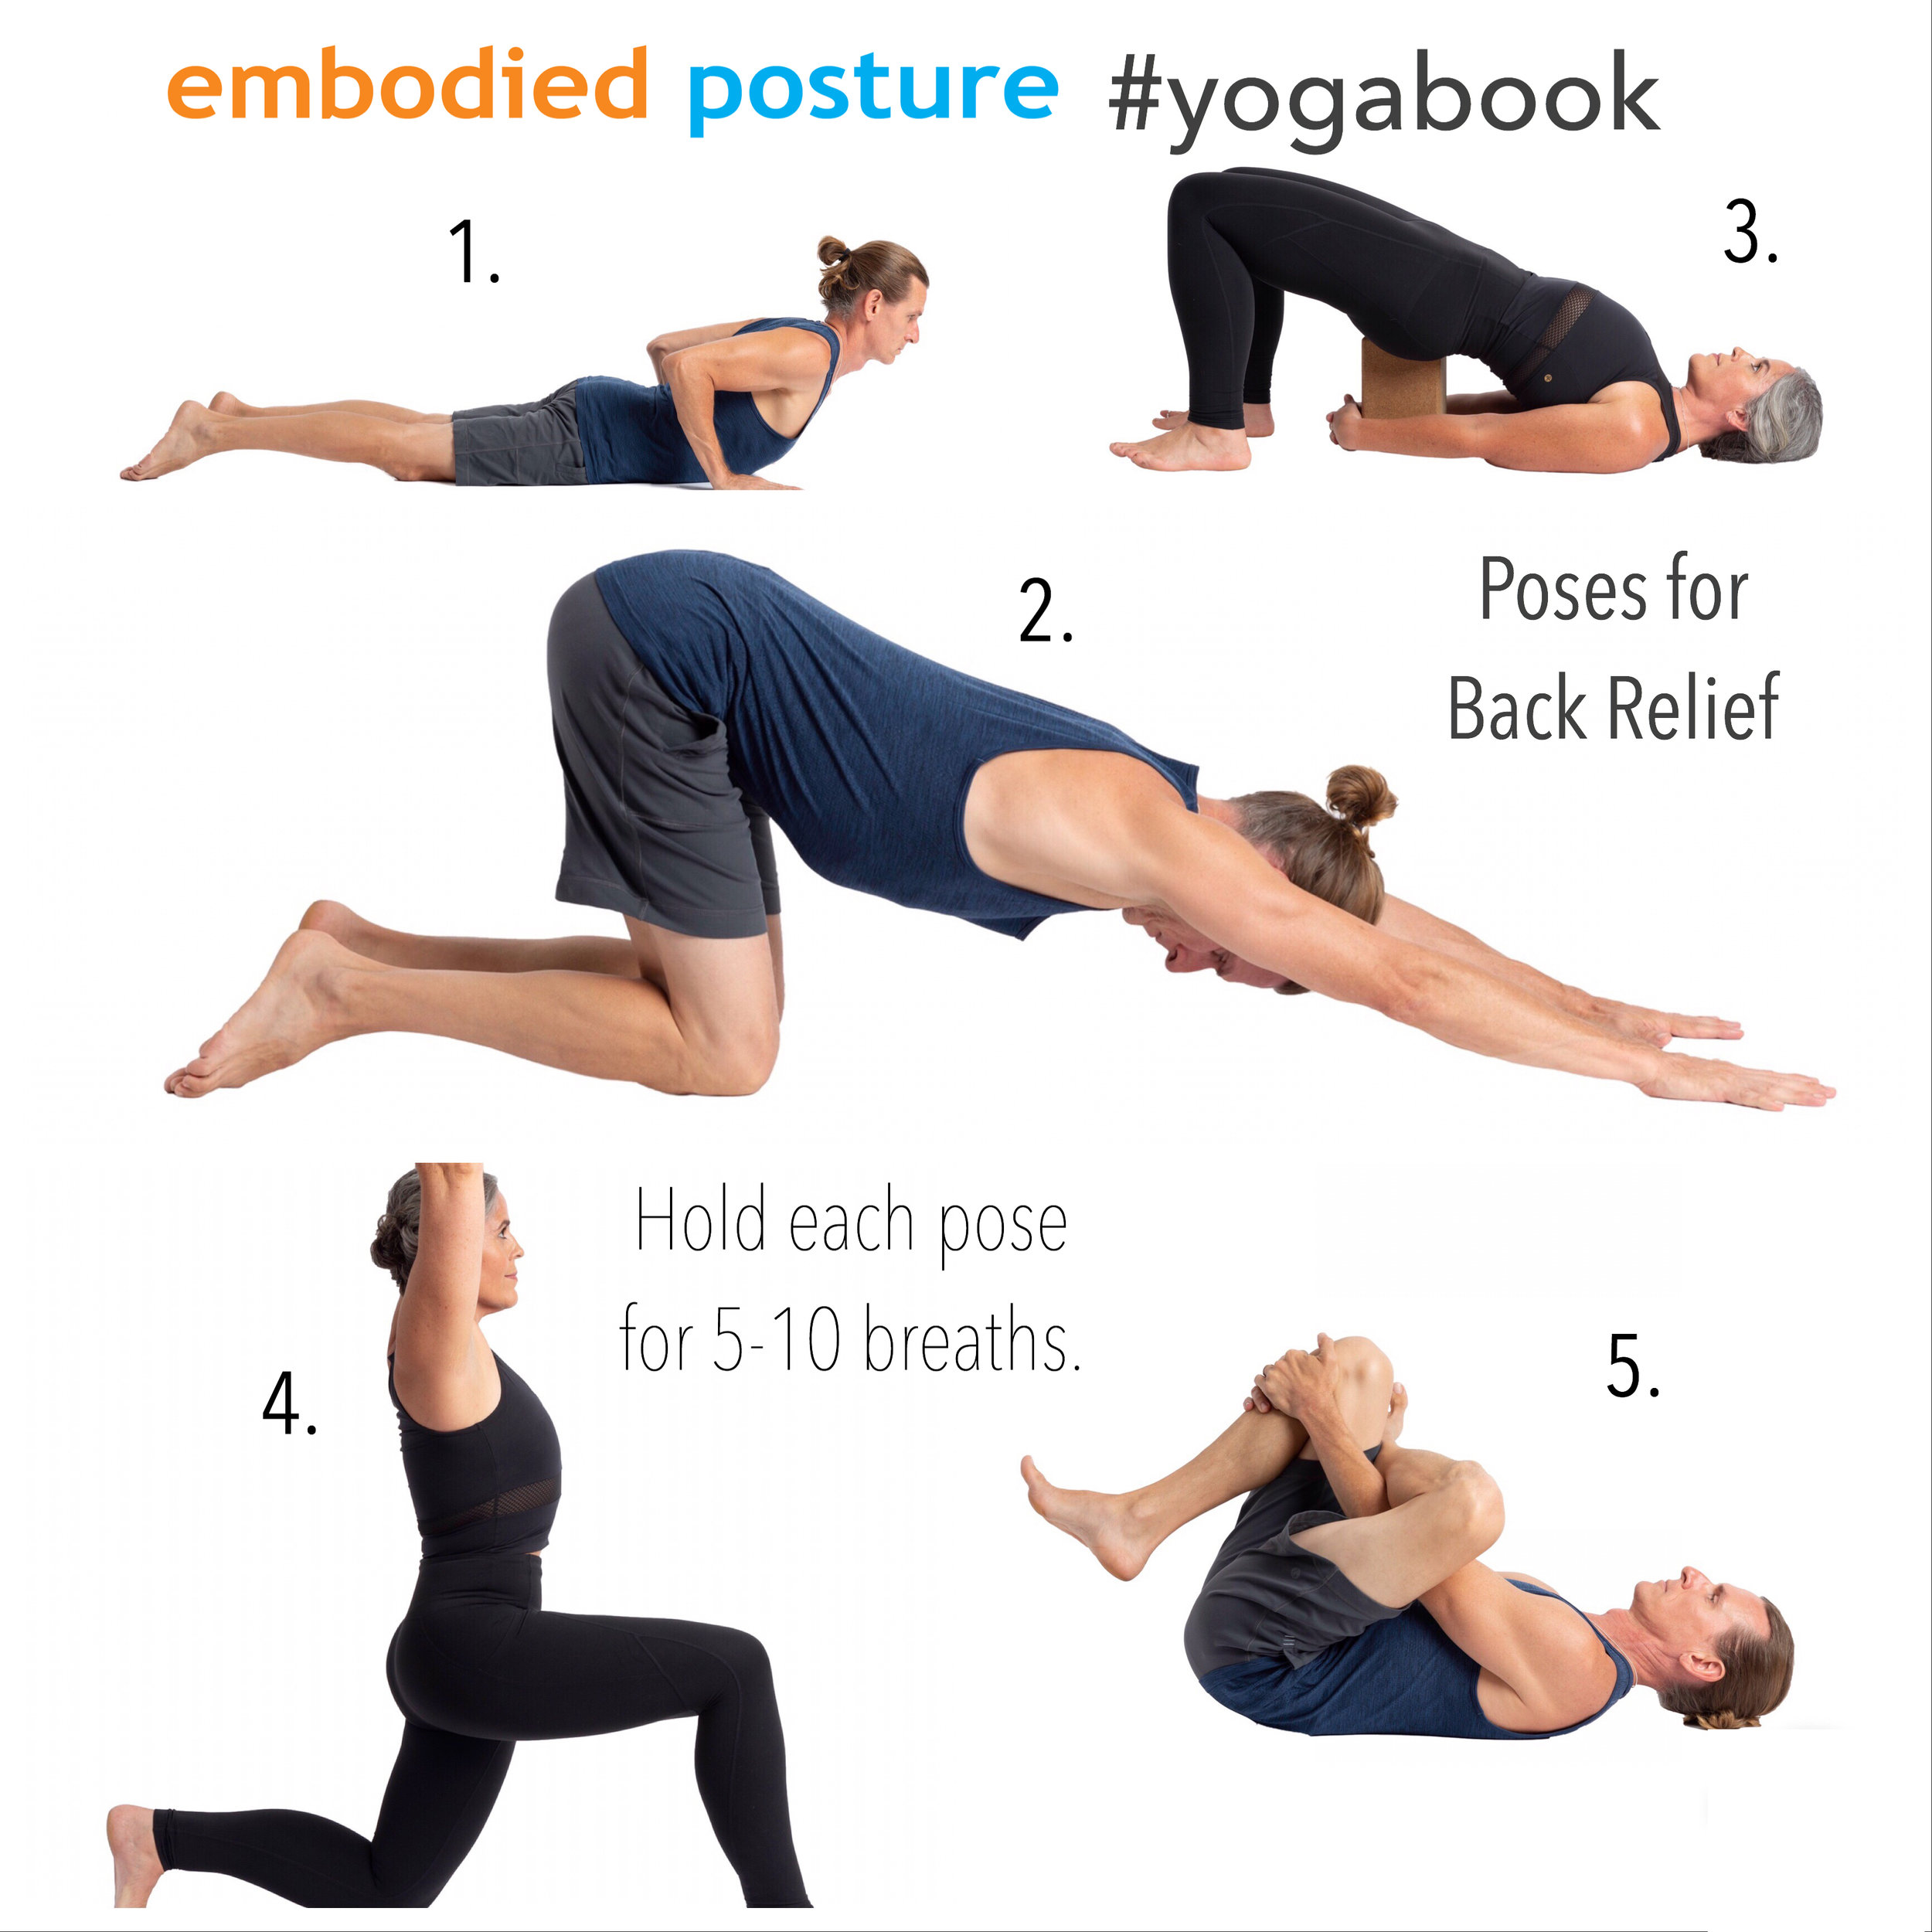
When I get the question, "What poses can I do for my back pain?" I always pause and scratch my head. Unless I know what is going on, it isn't straightforward for me to say what will be best. It is always most helpful for me to work with someone one on one. But, there are certain poses that seem to help people find relief. The poses in this illustration are generally helpful for people with lumbar disc injury. Even if you have never done yoga, you can mindfully try these postures. Keep in mind that the most important thing is that you slow down, sense, and feel. You may need minor adjustments and variations of these poses and I strongly encourage you to listen to your body. As always, it is best that you check with your doctor or physiotherapist for guidance on what you can and can't do. The information I am sharing is NOT for diagnosing or treating.
Cobra: From your belly—draw your hands back until your arms are near a 90-degree bend. Gently activate the muscles of your upper back to lift your chest and ribs away from the ground. Keep your neck long and relaxed. Use light pressure in your hands to create a gentle supported backward bend. You can use varying degrees of low abdominal engagement here. Tune in and feel what is happening. This pose puts your spine into extension, as described above. Visualize the S' more.
Puppy: From your hands and knees, walk your hands forward until your arms and torso are in a diagonal line. Draw your hips back in opposition from your hands. Close your eyes and breathe. This pose brings elongation and spaciousness between your vertebrae, providing fresh blood flow and vitality to your intervertebral discs. Visualize this. Zoom your awareness right into the spaces of your injury. Be cautious not to "hammock" into your shoulders. You may find that placing a block or cushion under your head is needed for support.
Bridge: From your back, draw your heels in close and slowly lift your hips off of the ground. Maintain a slight engagement in your lower abdomen to support your spine. Activate your legs away from the center of your chest while keeping your knees above your ankles. In the illustration, I am doing Supported Bridge with a block placed under my sacrum (avoid the lumbar spine). Bridge with or without the block is beneficial. Try both. This posture is another spinal extension or backward bend. Again, visualize the s' more.
Low Lunge: From a kneeling lunge stance, place your hands on your forward thigh for support. Close your eyes and fine-tune how far to lunge forward and how much to shift your pelvis. Imagine that you have suspenders on your front hip points, and you are lifting them while your tailbone draws down. These combined actions will help you access a stretch in your bottom leg hip flexors (front of the hip crease). Hip flexor stretch is the main goal here. Remember that a little goes a long way. Don't over-do it.
Supine Pigeon: From your back, create a figure four by crossing your right ankle over your left thigh. Hold on to the back of your lifted-leg thigh. Fine-tune by exploring different degrees of pulling your legs toward or away from your body. Tiny shifts left to right might also help you find just the right release. You may need a block or cushion underneath your head if it does not reach the floor comfortably. Here you are targeting the outer-hip compartment of the top leg. Close your eyes, breathe, and feel the release happening.
If time allows, give yourself 3 additional minutes to relax and breathe. Set the intention for healing to happen. You might use the guided audio breath practice that I share in The Power of Breath.I hope this information and my story enlightens you in some way.
Be patient, remain open, and hopeful.
Blessings & Namaste,
Stacy
Stacy Dockins
Author of Embodied Posture: Your Unique Body and Yoga
I’d love to connect with you on Social media!


